Перша спроба використати пакет Lightkurve (https://colab.research.google.com/github/christinahedges/KepSciConWorkshop/blob/master/Workshop.ipynb) для отримання фотометрії з TESS Full-Frame Images.
Зоря типу HADS CSS_J102714.3+205943 = TIC 171599792 = Gaia DR3 720971253464796288 спостерігалась TESS, але для неї не існує попередньо підготовленої кривої блиску (принаймні на 30 жовтня 2024 року, див. https://mast.stsci.edu/portal/Mashup/Clients/Mast/Portal.html). В таких випадках можна спробувати зробити фотометрію самостійно, використовуючи пакет Lightkurve.
Згідно порталу https://mast.stsci.edu/portal/Mashup/Clients/Mast/Portal.html, зоря спостерігалась у секторах 45, 46, 48, 72. У секторі 72 спостереження проводилися з найкоротшою експозицією 158 секунд, що прийнятно для зорі з періодом у ~99 хвилин (насправді, інтервал між точками 200 секунд).

Спочатку перевіримо наявність спостережень:
import lightkurve as lk
search_result = lk.search_tesscut('Gaia DR3720971253464796288')
print(search_result)
SearchResult containing 4 data products.
# mission year author exptime target_name distance
s arcsec
--- -------------- ---- ------- ------- -------------------------- --------
0 TESS Sector 46 2021 TESScut 475 Gaia DR3720971253464796288 0.0
1 TESS Sector 45 2021 TESScut 475 Gaia DR3720971253464796288 0.0
2 TESS Sector 48 2022 TESScut 475 Gaia DR3720971253464796288 0.0
3 TESS Sector 72 2023 TESScut 158 Gaia DR3720971253464796288 0.0
Далі отримуємо маленькі фрагменти зображень навколо зорі (target pixels):
search_result1 = lk.search_tesscut('Gaia DR3720971253464796288', sector=72)
tpf = search_result1.download(cutout_size=11)
print(tpf.flux.shape)
tpf.plot()

Розмір пікселя TESS дорівнює 21", тому зображення розміром 11 пікселів охоплює ділянку у майже 4 кутові хвилини. На щастя, в цій околиці немає зірок з порівняною яскравістю, інакше наша задача би помітно ускладнилась.
Генеруємо апертуру за допомогою create_threshold_mask ("this method will identify the pixels in the TPF which show a median flux
that is brighter than threshold times the standard deviation above the
overall median")
aper = tpf.create_threshold_mask(threshold=5)
tpf.plot(aperture_mask=aper)

Далі генеруємо криву блиску:
lc = tpf.to_lightcurve(aperture_mask=aper)
Результат, однак, не дуже... Фон дає сильний паразитний сигнал.

Виходячи зі здорового глузду, з зображень треба відняти фоновий сигнал, як це зазвичай робиться у апертурній фотометрії.
Я використав таку апертуру фона для оцінки інтенсивності фонового сигналу:
Після фотометрії з відніманням фонового сигналу результат (тут світловий потік) значно краще:
Після перетворення у зоряну величину (фрагмент, зоряна величина відносна):
і фазова крива (зоряна величина відносна):
Процедури, описані вище (фотометрія з відніманням фону) я робив 'вручну', за допомогою Python-скріпту, попередньо перетворивши набір міні-зображень target pixels у текстовий файл для подальших маніпуляцій.
Однак, можливий 'автоматизований' підхід, див. наприклад, https://www.youtube.com/watch?v=54osKe2E_sM&t=5923s
import lightkurve as lk
import pandas as pd
import numpy as np
import matplotlib.pyplot as plt
import matplotlib.cm as cm
import statistics
import math
import sys
###############################################################################
#c_sz = 11
# search_result = lk.search_tesscut('Gaia DR3720971253464796288')
# print(search_result)
# search_result1 = lk.search_tesscut('Gaia DR3720971253464796288', sector=72)
# tpf = search_result1.download(cutout_size=c_sz)
# print(tpf.flux.shape)
# tpf.plot()
#tpf.to_fits('tpf.fits')
###############################################################################
tpf = lk.read('tpf.fits')
tpf.plot()
#See https://www.youtube.com/watch?v=54osKe2E_sM&t=5923s
# background-subtracted images
flux_sub = []
n = 0
for image in tpf.hdu[1].data['FLUX']:
#n += 1
#print(n)
# here, we estimate the background as the average brightness
# of the faintest 10% of pixels in each frame.
background = image[image <= np.percentile(image, 10)].mean()
#print(background)
flux_sub.append(image - background)
# we now update the flux of the TPF
tpf.hdu[1].data['FLUX'] = np.array(flux_sub)
tpf.plot()
aper = tpf.create_threshold_mask(threshold=5)
tpf.plot(aperture_mask=aper)
lc = tpf.to_lightcurve(aperture_mask=aper)
lc.plot()
lc.to_fits('lc.fits')
В скрипті закоментована частина завантажує target pixels з серверу і зберегає його у файл 'tpf.fits' для подальшого використання.
В циклі від кожного мінізображення віднімається фоновий сигнал (див. коментарі).
Результатом є крива блиску у форматі FITS, яку можна відкрити у VStar як 'Lightkurve FITS'


За амплітудою змінності цей результат майже такий самий, як і отриманий 'вручну'. Різниця обумовлена різним підходом до оцінки фону. В 'ручному' варанті бралась фіксована апертура фону, а 'автоматизованому' сигнал фону оцінювався як середня інтенсивність 10% найтьмяніших пікселів зображення.

---------------------------
І, наприкінець, гібрід двох підходів (ефективна маніпуляція target pixels + user-defined background mask):
import lightkurve as lk
import numpy as np
#import sys
###############################################################################
def read_mask(file_name):
mask = []
with open(file_name, 'r') as f:
for line in f.readlines():
t = line[:-1].split('\t')
t = list(map(int, t))
mask.append(t)
mask = np.array(mask)
return mask
def get_bk_level(f, m, sz):
s = 0.0
n = 0
for i in range(0, sz):
for j in range(0, sz):
if m[i, j] != 0:
s += f[i, j]
n += 1
if n > 0:
return s / n
else:
return None
###############################################################################
c_sz = 11
search_result = lk.search_tesscut('Gaia DR3720971253464796288')
print(search_result)
search_result1 = lk.search_tesscut('Gaia DR3720971253464796288', sector=72)
tpf = search_result1.download(cutout_size=c_sz)
print(tpf.flux.shape)
tpf.plot()
tpf.to_fits('tpf.fits')
# ###############################################################################
tpf = lk.read('tpf.fits')
tpf.plot()
bk_mask = read_mask('bk_mask.txt')
#test
#image = tpf.hdu[1].data['FLUX'][0]
#bk_level = get_bk_level(image, bk_mask, 11)
#sys.exit(0)
#See https://www.youtube.com/watch?v=54osKe2E_sM&t=5923s
# background-subtracted images
flux_sub = []
n = 0
for image in tpf.hdu[1].data['FLUX']:
# background value (per pixel)
background = get_bk_level(image, bk_mask, c_sz)
flux_sub.append(image - background)
# we now update the flux of the TPF
tpf.hdu[1].data['FLUX'] = np.array(flux_sub)
tpf.plot()
aper = tpf.create_threshold_mask(threshold=5)
tpf.plot(aperture_mask=aper)
lc = tpf.to_lightcurve(aperture_mask=aper)
lc.plot()
lc.to_fits('lc-v3.fits')
----------------

З результуючим fits-файлом можна працювати у VStar (відкривши його як 'Lightkurve FITS').
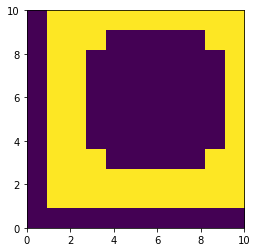
Текстовий файл маски фону bk_mask.txt виглядає так:
0 0 0 0 0 0 0 0 0 0 0
0 1 1 1 1 1 1 1 1 1 1
0 1 1 1 1 1 1 1 1 1 1
0 1 1 1 0 0 0 0 0 1 1
0 1 1 0 0 0 0 0 0 0 1
0 1 1 0 0 0 0 0 0 0 1
0 1 1 0 0 0 0 0 0 0 1
0 1 1 0 0 0 0 0 0 0 1
0 1 1 0 0 0 0 0 0 0 1
0 1 1 1 0 0 0 0 0 1 1
0 1 1 1 1 1 1 1 1 1 1
в графічному вигляді:
Посилання:
https://heasarc.gsfc.nasa.gov/docs/tess/Target-Pixel-File-Tutorial.html
https://heasarc.gsfc.nasa.gov/docs/tess/Full-Frame-Image-Tutorial.html
https://colab.research.google.com/github/christinahedges/KepSciConWorkshop/blob/master/Workshop.ipynb
https://www.youtube.com/watch?v=54osKe2E_sM&t=5923s